


1.SpringBoot简单入门
需求:使用 SpringBoot 开发一个web应用,浏览器发起请求 /hello 后,给浏览器返回字符串 “hello world ~"。
1.1 创建Maven工程
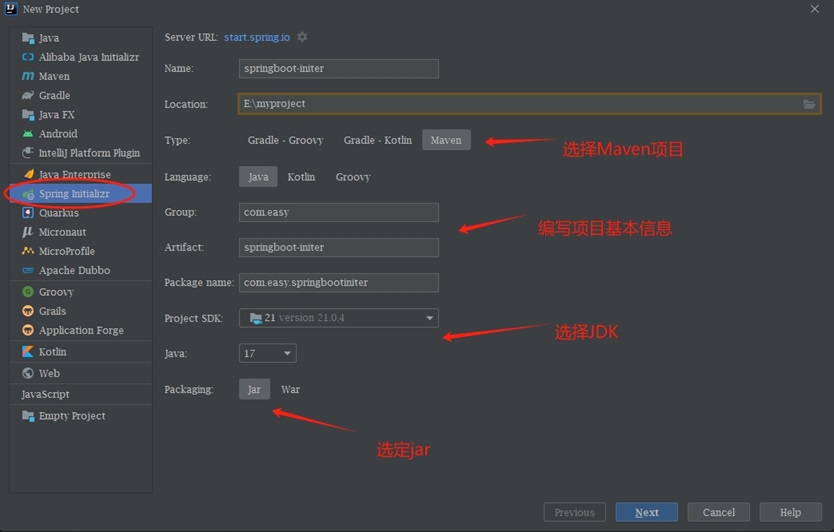
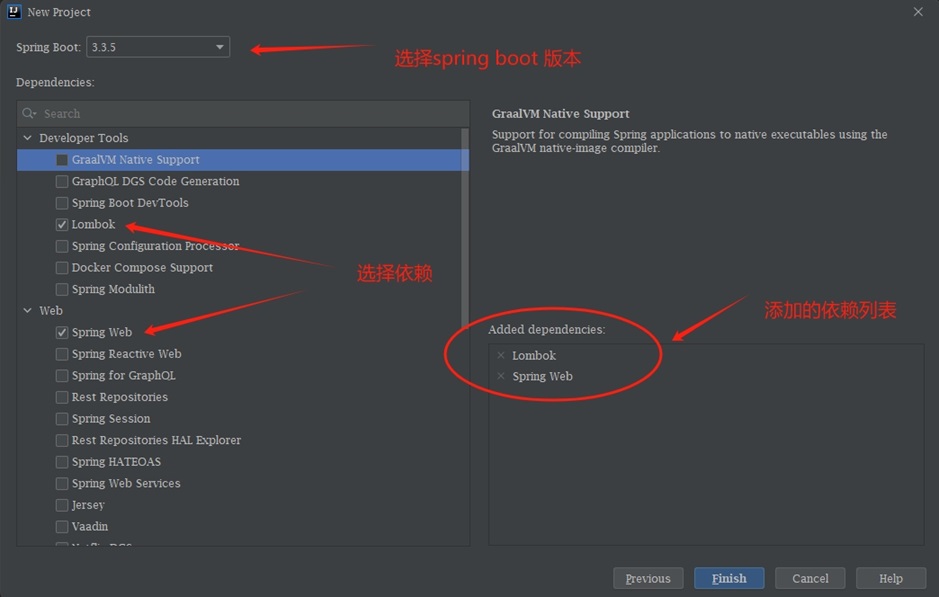
1.2 导入spring-boot-stater-web起步依赖
1.3 编写Controller
package com.easy.controller;
import org.springframework.web.bind.annotation.RequestMapping;
import org.springframework.web.bind.annotation.RestController;

@RestController
public class HelloController {

    @RequestMapping("/hello")
    public String hello() {
        return "hello world";
    }
}
1.4 提供启动类
package com.easy;
import org.springframework.boot.SpringApplication;
import org.springframework.boot.autoconfigure.SpringBootApplication;

@SpringBootApplication
public class DemoApplication {

    public static void main(String[] args) {
        SpringApplication.run(DemoApplication.class, args);
    }
}
1.5 启动测试
运行启动类,访问 http://localhost:8080/hello就能看到返回的结果了。
2.手动创建Springboot工程
这里以JDK-8为例:
pom.xml:
<?xml version="1.0" encoding="UTF-8"?>
<project xmlns="http://maven.apache.org/POM/4.0.0"
         xmlns:xsi="http://www.w3.org/2001/XMLSchema-instance"
         xsi:schemaLocation="http://maven.apache.org/POM/4.0.0 http://maven.apache.org/xsd/maven-4.0.0.xsd">
    <modelVersion>4.0.0</modelVersion>

    <parent>
        <groupId>org.springframework.boot</groupId>
        <artifactId>spring-boot-starter-parent</artifactId>
        <version>2.7.18</version>
        <relativePath/>
    </parent>

    <groupId>com.easy</groupId>
    <artifactId>springboot-initer</artifactId>
    <packaging>pom</packaging>
    <version>1.0-SNAPSHOT</version>

    <properties>
        <project.build.sourceEncoding>UTF-8</project.build.sourceEncoding>
        <project.reporting.outputEncoding>UTF-8</project.reporting.outputEncoding>
        <java.version>8</java.version>
        <spring-boot.version>2.7.18</spring-boot.version>
    </properties>

    <dependencies>
        <dependency>
            <groupId>org.springframework.boot</groupId>
            <artifactId>spring-boot-starter-web</artifactId>
        </dependency>
    </dependencies>

    <build>
        <plugins>
            <plugin>
                <groupId>org.apache.maven.plugins</groupId>
                <artifactId>maven-compiler-plugin</artifactId>
                <version>3.8.1</version>
                <configuration>
                    <source>${maven.compiler.source}</source>
                    <target>${maven.compiler.target}</target>
                </configuration>
            </plugin>
            <plugin>
                <groupId>org.springframework.boot</groupId>
                <artifactId>spring-boot-maven-plugin</artifactId>
                <version>${spring-boot.version}</version>
            </plugin>
        </plugins>
    </build>
</project>
编写控制器,启动类等与上面保持相同即可。
3.配置文件
SpringBoot提供了多种属性配置方式,properties 或者 yaml 格式。
配置文件在maven工程的 src\main\resources目录中。
3.1 properties 或者 yaml 格式
application.properties
server.port=8081
server.servlet.context-path=/start
application.yml / application.yaml
server:
  port: 8082
  servlet:
    context-path: /start2
3.2 自定义配置信息
通过上面配置文件,推荐使用 yaml格式,简洁,层次清晰。
3.2.1 yml配置信息书写与获取
email:
  user: 111@qq.com
  code: 123
  host: smtp.qq.com
  auth: true
- 值前边必须有空格,作为分隔符
- 使用空格作为缩进表示层级关系,相同的层级左侧对齐
3.2.2 配置信息获取
@Value("${键名}")
编写配置类
package com.zhouzz.springboot.simple.config;
import org.springframework.beans.factory.annotation.Value;
import org.springframework.stereotype.Component;

@Component
public class EmailProperties {

    @Value("${email.user}")
    private String user;
    @Value("${email.code}")
    private String code;
    @Value("${email.host}")
    private String host;
    @Value("${email.auth}")
    private Boolean auth;

    public String getUser() {
        return user;
    }

    public void setUser(String user) {
        this.user = user;
    }

    public String getCode() {
        return code;
    }

    public void setCode(String code) {
        this.code = code;
    }

    public String getHost() {
        return host;
    }

    public void setHost(String host) {
        this.host = host;
    }

    public Boolean getAuth() {
        return auth;
    }

    public void setAuth(Boolean auth) {
        this.auth = auth;
    }
}
@ConfigurationProperties(prefix = "前缀")
package com.zhouzz.springboot.simple.config;
import org.springframework.boot.context.properties.ConfigurationProperties;
import org.springframework.stereotype.Component;

@Component
@ConfigurationProperties(prefix = "email")
public class EmailProperties {

    private String user;
    private String code;
    private String host;
    private Boolean auth;

    //getXXX/setXXX
}
3.如何使用
EmailProperties类有注解 @Component,说明可以注入到Spring容器中,则我们可以在调用类中声明即可使用。
@Autowired
private EmailProperties emailProperties;
4.Bean管理
4.1 Bean扫描
在Spring中扫描包如何配置:
- 标签:
<context:component-scan base-package="com.itheima"/> - 注解:
@ComponentScan(basePackages = "com.itheima")
配置常用注解:
| 注解 | 说明 | 位置 |
|---|---|---|
| @Component | 声明bean的基础注解 | 不属于以下三类时,用此注解 |
| @Controller | @Component的衍生注解 | 标注在控制器类上 |
| @Service | @Component的衍生注解 | 标注在业务类上 |
| @Repository | @Component的衍生注解 | 标注在数据访问类上(由于与mybatis整合,用的少) |
在Springboot中 @SpringBootApplication,如果默认配置则扫描启动类所在的包及其子包(比如以下就是扫描 com.zhouzz.springboot.simple包下的所有配置类):
package com.zhouzz.springboot.simple;
import ...
@SpringBootApplication
public class SpringbootQuickstartApplication {
  public static void main(String[] args) {
    SpringApplication.run(SpringbootQuickstartApplication.class, args);
  }
}
它是一个组合注解:
@Target({ElementType.TYPE})
@Retention(RetentionPolicy.RUNTIME)
@Documented
@Inherited
@SpringBootConfiguration
@EnableAutoConfiguration
@ComponentScan(
    excludeFilters = {@Filter(
    type = FilterType.CUSTOM,
    classes = {TypeExcludeFilter.class}
), @Filter(
    type = FilterType.CUSTOM,
    classes = {AutoConfigurationExcludeFilter.class}
)}
)
public @interface SpringBootApplication {
    @AliasFor(
        annotation = EnableAutoConfiguration.class
    )
    Class<?>[] exclude() default {};

    @AliasFor(
        annotation = EnableAutoConfiguration.class
    )
    String[] excludeName() default {};

    @AliasFor(
        annotation = ComponentScan.class,
        attribute = "basePackages"
    )
    String[] scanBasePackages() default {};

    ...
}
里面就包含 @ComponentScan。如果要扫描其他包下的类,则需要配置scanBasePackages属性,比如 @SpringBootApplication(scanBasePackages = {"com.zhouzz","com.easy"})。
4.2 Bean注册
如果要注册的bean对象来自于第三方(不是自定义的),是无法用 @Component 及衍生注解声明bean的
1.@Bean
如果要注册第三方bean,建议在配置类中集中注册
@Configuration
public class CommonConfig {

    @Bean
    public Student student() {
        return new Student();
    }
}
2.@Import
- 导入 配置类
@Import(CommonConfig.class) // 这里手动导入的可以是任意包下的多个类
@SpringBootApplication
public class DemoApplication {
    public static void main(String[] args) {
        SpringApplication.run(DemoApplication.class, args);
    }
}
- 导入 ImportSelector 接口实现类
public class CommonImportSelector implements ImportSelector {

    // Spring boot 会自动调用 selectImports()方法,
    // 得到字符串数组中的全限定名的类自动注入到Spring容器中
    @Override
    public String[] selectImports(AnnotationMetadata importingClassMetadata) {
        //这里是固定写死的类
        //String[] arr = {"com.xxx.CommonConfig"};

        //读取配置文件的类
        List<String> imports = new ArrayList<>();
        InputStream in = CommonImportSelector.class.getClassLoader()
                .getResourceAsStream("common.imports");
        BufferedReader br = new BufferedReader(new InputStreamReader(in));
        String line = null;
        try {
            while ((line = br.readLine()) != null) {
                imports.add(line);
            }
        } catch (Exception e) {
            e.printStackTrace();
        } finally {
            try {
                in.close();
            } catch (IOException ex) {
                ex.printStackTrace();
            }
            try {
                br.close();
            } catch (IOException ex) {
                ex.printStackTrace();
            }
        }

        String[] arr = imports.toArray(new String[0]);
        return arr;
    }
}
使用:
@Import(CommonImportSelector.class)
@SpringBootApplication
public class DemoApplication {

    public static void main(String[] args) {
        SpringApplication.run(DemoApplication.class, args);
    }
}
当然可以使用组合注解,在启动类上标识的更优雅。使用@EnableXxx注解,封装@Import注解。
添加注解类:
@Target({ElementType.TYPE})
@Retention(RetentionPolicy.RUNTIME)
@Import(CommonImportSelector.class)
public @interface EnableCommonConfig {
}
之后在启动类上标注:
@EnableCommonConfig
@SpringBootApplication
public class DemoApplication {

    public static void main(String[] args) {
        SpringApplication.run(DemoApplication.class, args);
    }
}
这样就能更加优雅的体现加载 CommonImportSelector 配置类中的内容了。
这种方式,在第三方封装包或源码中都是常见做法。
4.3 注册条件
SpringBoot提供了设置注册生效条件的注解 @Conditional
| 注解 | 说明 |
|---|---|
| @ConditionalOnProperty | 配置文件中存在对应的属性,才声明该bean |
| @ConditionalOnMissingBean | 当不存在当前类型的bean时,才声明该bean |
| @ConditionalOnClass | 当前环境存在指定的这个类时,才声明该bean |
案例:
这里可以测试当引入 spring-boot-starter-web 包时,查询 Student 类是否注入,当去掉 spring-boot-starter-web 包时,测试Spring容器中是否存在 Student 类。
@Configuration
public class CommonConfig {

    //如果当前环境中存在 DispatcherServlet 类,则注入 Student,否则不注入
    @ConditionalOnClass(name = "org.springframework.web.servlet.DispatcherServlet")
    @Bean
    public Student student() {
        return new Student();
    }
}
5.自动配置原理
遵循约定大约配置的原则,在boot程序启动后,起步依赖中的一些bean对象会自动注入到ioc容器。
自动配置-源码分析
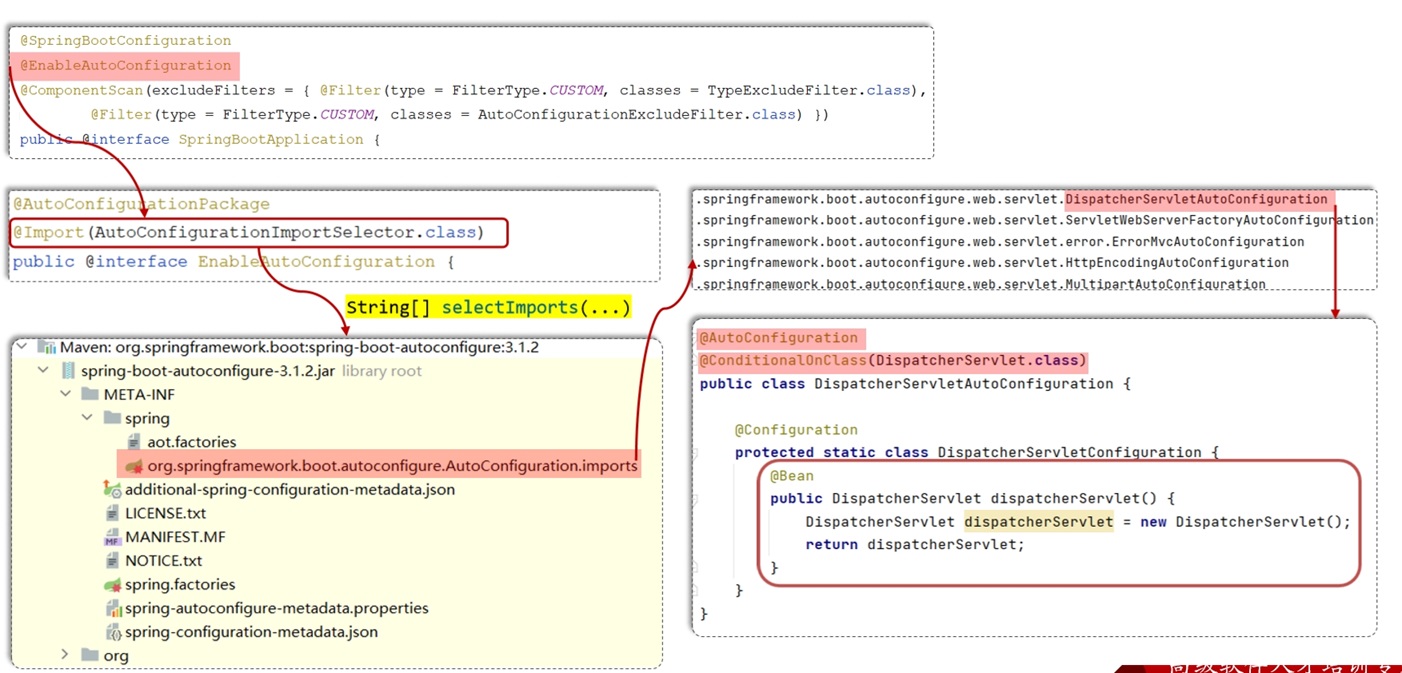
SpringBoot自动配置加载步骤:
- 在主启动类上添加了
SpringBootApplication注解,这个注解组合了EnableAutoConfiguration注解 EnableAutoConfiguration注解又组合了Import注解,导入了AutoConfigurationImportSelector类- 实现
selectImports方法,这个方法经过层层调用,最终会读取META-INF目录下的 后缀名 为imorts的文件,当然了,boot2.7以前的版本,读取的是spring.factories文件 - 读取到全类名了之后,会解析注册条件,也就是
@Conditional及其衍生注解,把满足注册条件的Bean对象自动注入到IOC容器中
6.自定义stater
在实际开发中,经常会定义一些公共组件,提供给各个项目团队使用。而在SpringBoot的项目中,一般会将这些公共组件封装为SpringBoot 的 starter。
需求: 需要自定义mybatis的starter
- 创建
dmybatis-spring-boot-autoconfigure模块,提供自动配置功能,并自定义配置文件META-INF/spring/xxx.imports
该项目中pom.xml
<dependencies>
    <dependency>
        <groupId>org.springframework.boot</groupId>
        <artifactId>spring-boot-starter</artifactId>
    </dependency>
    <dependency>
        <groupId>org.springframework.boot</groupId>
        <artifactId>spring-boot-starter-data-jdbc</artifactId>
    </dependency>
    <dependency>
        <groupId>org.mybatis</groupId>
        <artifactId>mybatis</artifactId>
        <version>3.5.15</version>
    </dependency>
    <dependency>
        <groupId>org.mybatis</groupId>
        <artifactId>mybatis-spring</artifactId>
        <version>3.0.3</version>
    </dependency>
</dependencies>
package com.zhouzz.mybatis.config;
import org.apache.ibatis.annotations.Mapper;
import org.mybatis.spring.SqlSessionFactoryBean;
import org.mybatis.spring.mapper.MapperScannerConfigurer;
import org.springframework.beans.factory.BeanFactory;
import org.springframework.boot.autoconfigure.AutoConfiguration;
import org.springframework.boot.autoconfigure.AutoConfigurationPackages;
import org.springframework.context.annotation.Bean;
import javax.sql.DataSource;
import java.util.List;

@AutoConfiguration  //标识当期类是自动配置类
public class MybatisAutoConfig {

    //SqlSessionFactoryBean
    @Bean
    public SqlSessionFactoryBean sqlSessionFactoryBean(DataSource dataSource) {
        SqlSessionFactoryBean sqlSessionFactoryBean = new SqlSessionFactoryBean();
        sqlSessionFactoryBean.setDataSource(dataSource);
        return sqlSessionFactoryBean;
    }

    //MapperScannerConfigure
    @Bean
    public MapperScannerConfigurer mapperScannerConfigurer(BeanFactory beanFactory) {
        //扫描的包:启动类所在的包及其子包
        MapperScannerConfigurer mapperScannerConfigurer = new MapperScannerConfigurer();
        List<String> packages = AutoConfigurationPackages.get(beanFactory);
        String p = packages.get(0);
        mapperScannerConfigurer.setBasePackage(p);
        //扫描的注解
        mapperScannerConfigurer.setAnnotationClass(Mapper.class);
        return mapperScannerConfigurer;
    }
}
在 src/main/resources目录中,添加 META-INF/spring/org.springframework.boot.autoconfigure.AutoConfiguration.imports
其内容如下:
com.zhouzz.mybatis.config.MybatisAutoConfig
- 创建
dmybatis-spring-boot-starter模块,在starter中引入自动配置模块
pom.xml
<dependencies>
    <!-- 引入自动配置 -->
    <dependency>
        <groupId>com.zhouzz</groupId>
        <artifactId>dmybatis-spring-boot-autoconfigure</artifactId>
        <version>1.0.0-SNAPSHOT</version>
    </dependency>

    <dependency>
        <groupId>org.springframework.boot</groupId>
        <artifactId>spring-boot-starter</artifactId>
    </dependency>
    <dependency>
        <groupId>org.springframework.boot</groupId>
        <artifactId>spring-boot-starter-data-jdbc</artifactId>
    </dependency>
    <dependency>
        <groupId>org.mybatis</groupId>
        <artifactId>mybatis</artifactId>
        <version>3.5.15</version>
    </dependency>
    <dependency>
        <groupId>org.mybatis</groupId>
        <artifactId>mybatis-spring</artifactId>
        <version>3.0.3</version>
    </dependency>
</dependencies>
这样我们就可以在其他业务模块中 引入 dmybatis-spring-boot-starter,直接使用了。
评论区